#4 Nuxt Routes Rundown
Chapter notes on Nuxt Routes and surrounding features
🌟 Welcome to NuxtDojo Newsletter #4! 🌟
Nuxt Routes may initially appear straightforward—simply create Vue files in the ~/pages directory, and the file-based routing system will automatically generate pages. However, as you delve deeper into the subject, Nuxt Routes becomes a more intricate and interesting topic to learn!
Let's dive into Nuxt Routes at Nuxter's Corner and take a brief look at my Lucidchart Dashboard over at the Author's Corner.
Happy reading!
Nuxter’s Corner
The Nuxt Routes chapter will be included in the Nuxt Fundamentals part of the book. Understanding the types of routes will help you organise your Nuxt 3 application effectively and handle various URL patterns efficiently.
Let's break down the different types of routes in Nuxt 3:
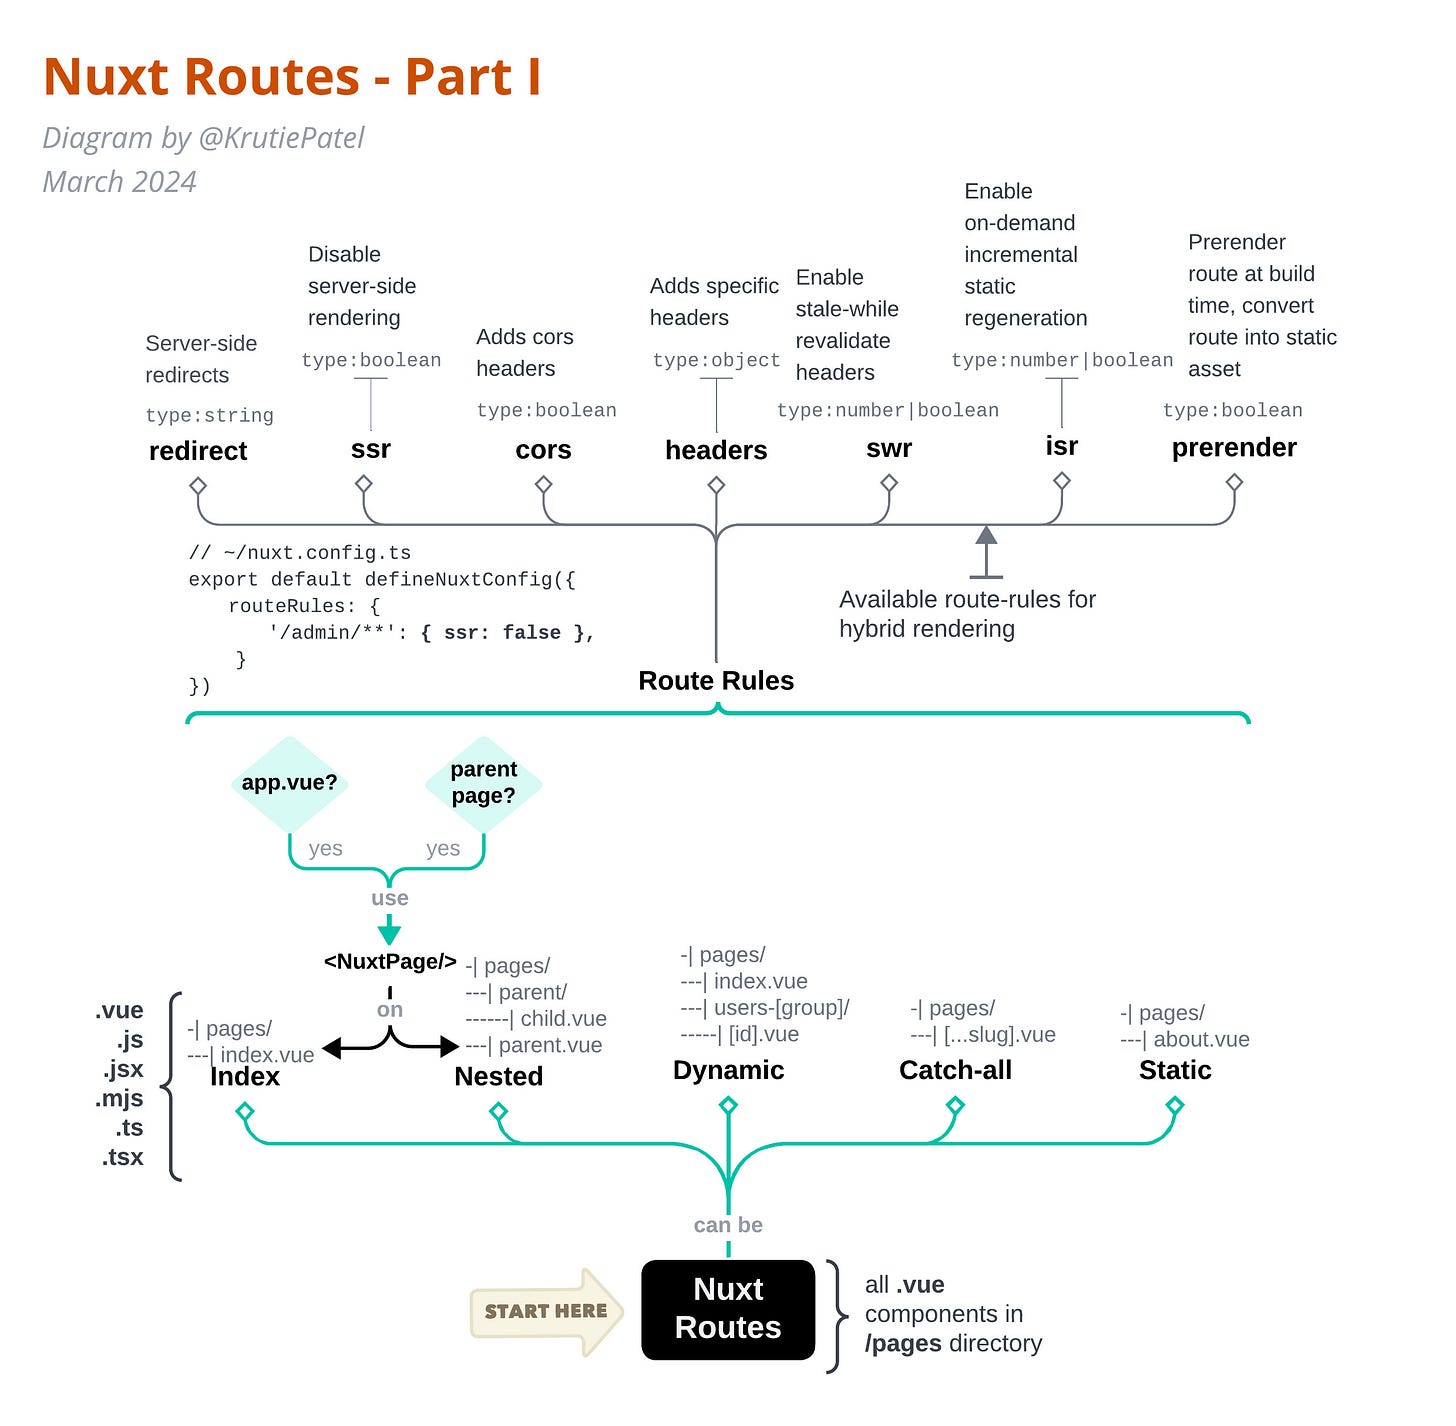
Index Route: Index route is represented by the index.vue file in the root of the ~/pages directory.
Static Routes: Static routes are straightforward routes that map directly to a single file. They are ideal for pages that don't need to fetch any data from an API or database.
Dynamic Routes: Dynamic routes allow you to match dynamic segments in the URL and pass them as parameters to your page components. They are defined in the file name with a pair of square brackets and name of the parameter, i.e. [slug].vue
Catch-all Routes: Catch-all routes are used to match any URL that hasn't been matched by other routes. They are defined by using three dots in the file name enclosed within a pair of square brackets, i.e. […slug].vue
Nested Routes: Nested routes allow you to create a hierarchy of routes by organising them into nested directories. In Nuxt, parent-child relationship between routes is indicated by a file and directory with the same name.
Nuxt 3 introduces a new feature that allows for a flexible mix of rendering methods across individual pages. This is made possible through the implementation of Route Rules, which can be specified within the Nuxt configuration settings.
Essentially, this feature grants developers the flexibility to define how each page should be rendered, whether it be server-side, statically, or via client-side rendering, on a case-by-case basis. The addition of Route Rules enhances the control over the rendering process, enabling a tailored approach to how content is delivered and displayed based on the specific needs of each page.
The diagram provided below offers a high-level overview of the available route types and the new route rules, illustrating how they interact and how they can be applied within a Nuxt 3 application to optimise performance and user experience.
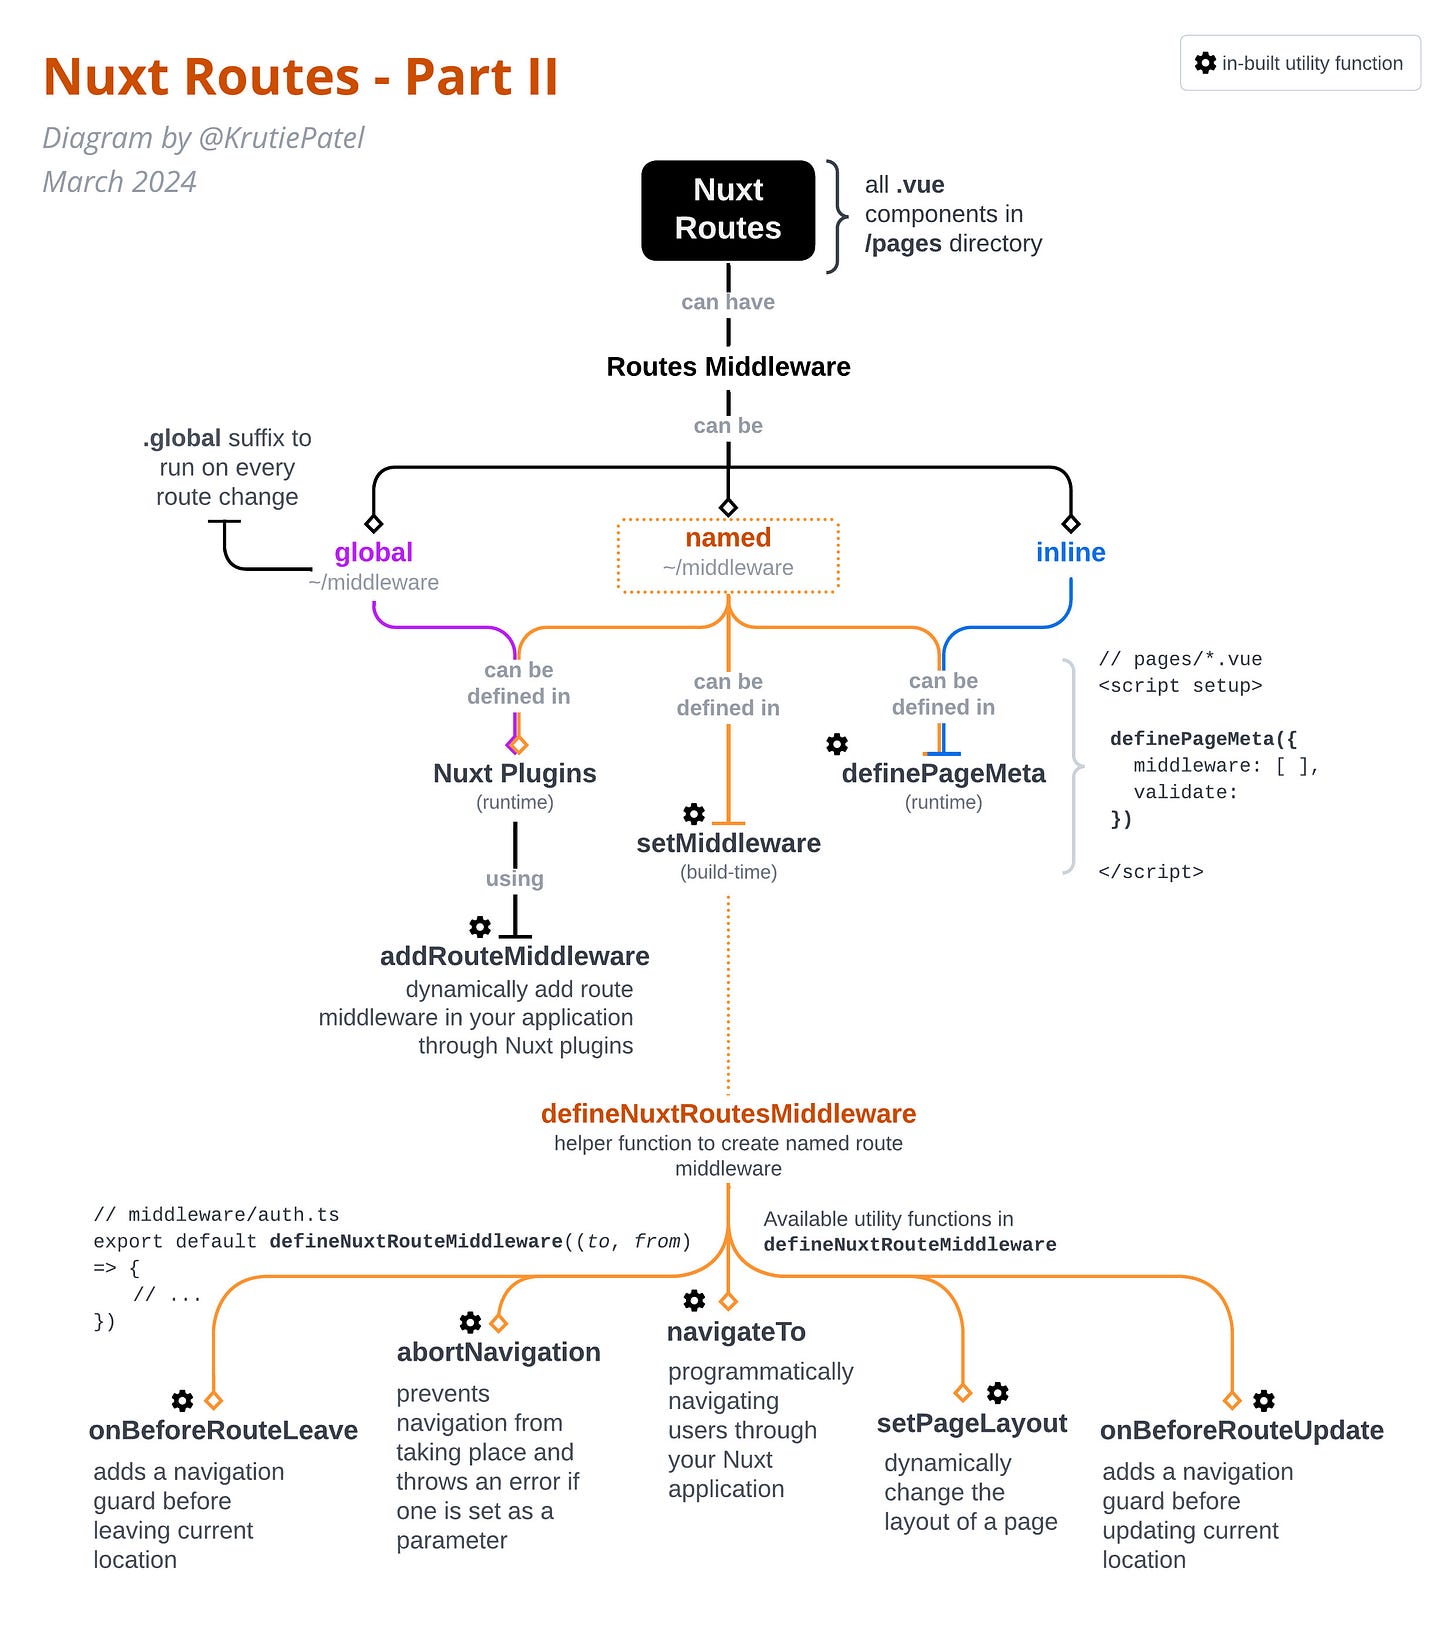
Route middleware in Nuxt is a powerful feature that allows you to execute code before rendering a page or a group of pages (routes). This functionality is tightly integrated with Nuxt's routing system, providing a mechanism to perform tasks such as authentication checks, data prefetching, or conditionally redirecting users based on specific criteria before a route is fully resolved and its components are rendered. Middleware can be applied globally or to individual pages.
Nuxt provides a built-in collection of utility functions to be used with route middleware. These utilities are part of Nuxt's rich ecosystem, designed to simplify tasks, including navigation, manipulating layouts or even setting route middleware at build-time and more.
The diagram below illustrates some of the key utility functions provided by Nuxt that are particularly useful when working with route middleware along with where to use them and when (runtime or build-time) to use them.
And lastly, Nuxt 3 also comes equipped with a collection of essential Vue components that are available for immediate use right from the start. These components are automatically imported and ready to use on Nuxt pages.
In considering the content for my book, I am planning to use examples from e-commerce platforms or headless Content Management Systems (CMS) to explain the variety of route types and help you think in terms of Nuxt routes and surrounding features. These examples are well-suited for such a demonstration because they leverage the full spectrum of routing and rendering techniques available. E-commerce sites and headless CMS platforms often require a dynamic mix of server-side, client-side, and static rendering methods to efficiently handle the diverse needs of their web pages.
E-commerce platforms, for example, utilise server-side rendering for product pages to ensure SEO effectiveness and client-side rendering for user dashboards for a more interactive experience. Static rendering might be used for help pages or blog posts that do not often change. Similarly, headless CMS platforms need to serve content-rich pages that are SEO friendly, while also managing dynamic user interactions that benefit from client-side rendering.
Secondly, these platforms often require sophisticated access control mechanisms to differentiate between various user roles—be it customers, content editors, or administrators. Route middleware becomes a critical tool in managing these distinctions, ensuring that users only access the content and functionalities relevant and permitted to their roles. This middleware can help us enforce authentication, authorise specific actions, and redirect users based on their login status or permissions, which shows the necessity of middleware in routing and power of Nuxt 3 in handling complex web development scenarios.
By using these examples, I aim to provide a practical context that illustrates how different types of routes can be used to address specific requirements of web applications. This way, I hope my chapter will look less like documentation and more relatable to real-world scenarios.
Author’s Corner
Concept diagrams are visual treats among technicalities - your reference points or gateway to more abstract technical concepts that might be difficult to convey with text alone. Ultimate goal of diagrams in my Nuxt book will be to facilitate deeper understanding of the Nuxt framework.
If you have been following my work for a while now, then you’d know that these diagrams can play a crucial role in breaking down complex concepts, making them more accessible and easier to understand for readers. Making these diagrams has become a major part of creating this Nuxt book. For those who don’t know, I use Lucidchart to make these diagrams. Here’s a little sneak peek of my Lucidchart dashboard.
I hope to incorporate engaging and aesthetically pleasing diagrams throughout the book to make the technical journey through Nuxt much more enjoyable and effective.
You can find more Nuxt diagrams like these on my website, and if you're interested in making diagrams like these on your own, take a look at the resources I've written on Medium:
How to Create Technical Conceptual Diagrams - Read on Medium
Conceptual Technical Diagrams: How to Think in Terms of Shapes, Icons, and Legend - Read on Medium
Thank you for joining me on this adventure, and I hope you find inspiration and enlightenment within these pages.
🚀 How You Can Participate:
📚 Read Along: Subscribe to the newsletter to receive updates, diagrams, and behind-the-scenes content.
🤝 Community Interaction: Share topic suggestions for the book, questions, and insights here on NuxtDojo Substack.
🚀 Spread the Word: Let others know about NuxtDojo – share on social media and among your developer circles.
Warm regards,
Krutie @ NuxtDojo 🚀📚


Note for this chapter: Nuxt 3.11 introduces server and client pages.
https://nuxt.com/blog/v3-11#%EF%B8%8F-server-and-client-only-pages
Note for this chapter: Nuxt 3.11 introduces new routeRule: `appMiddleware`
https://github.com/nuxt/nuxt/pull/25841
Example: https://nuxt.com/blog/v3-11#%EF%B8%8F-middleware-routerules